How to work on FASSE#
The following are instructions for logging in to FASSE and setting up your own workspace.
Step 1. Join our project group#
Get a FASRC account by requesting it here.
Navigate to the Add Grants page in portal, you will need to login with your FASRC account
Expand the plus sign next to “Other”
Find the project group you want to be added to:
dominici_nsaphSelect the checkbox for the project group you want to be added to
Your PI will have to approve the addition. Once you’re notified of the approval, it can take up to an hour for your permissions to be configured. If you’re not able to access the VPN or your home directory, try waiting an hour and logging in again.
Step 2. Connect to Harvard’s VPN#
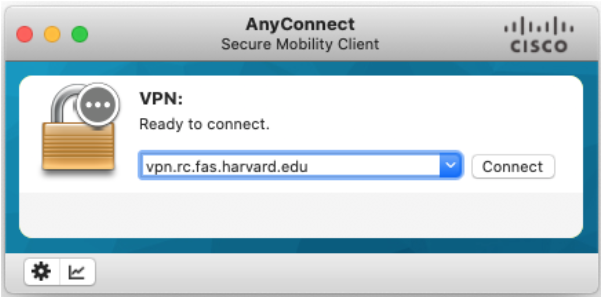
Install Cisco AnyConnect client to connect to the FASRC VPN. Install 2FA, i.e., Google Authenticator for FASRC. Set it up as explained here.
Type
vpn.rc.fas.harvard.eduin the Cisco AnyConnect text box (see figures).Type your username in the format
username@fasse, password and verification code (same as for FASRC).

Warning
CMS prohibits accessing data while outside of the U.S., this includes not only opening data files but also submitting code/jobs to run on the data.
Step 3. Access FASSE#
There are a few ways to access FASSE. You can access it via VDI/OoD (in the web browser) by clicking the link here: https://fasseood.rc.fas.harvard.edu/
You can also access it via command line (Terminal) by typing: ssh username@fasselogin.rc.fas.harvard.edu.
To learn more about working in the command line, check out this Unix Shell tutorial.
Note
The username, password and verification code are the same as in the previous step (and the same as for FASRC).
Tip
For more information, see the official documentation.
Step 4. Choose your project’s short name#
Your project name should be informative for the group members and outsiders. Think of a project name in the following format:
<exposure>-<outcome>-<method>
Exposure examples:
pm-components,pm-no2,pm-no2-o3,heat-alertOutcome examples:
cardiovascular,respiratory,adrdMethod:
reinforcement-learning,causalgps
For example: heat_alert-mortality-reinforcement_learning or shorter heat_alert-mortality-rl.
In practice, you may have multiple exposures and outcomes. In that case, use your best judgement for your project name based on the guidelines.
Avoid adding information such as usernames and current date or year.
Step 5. Create a git repository on GitHub#
Navigate to NSAPH Projects GitHub organization in your web browser. NSAPH Projects GitHub organization is a shared account where all NSAPH members can collaborate across many projects at once. If you are not already a member of NSAPH Projects, ask one of the admins to add you to the organization.
Crete a new git repository under NSAPH Projects and name it with your project name.
When creating your new repository, make sure to:
Initialize with a README: Select the “Add a README file” option. This file serves as an introduction to your project and is a good place to describe its purpose, structure, and usage.
Choose a License: From the dropdown menu, select the MIT License. This is a permissive license that allows others to use, modify, and distribute your project with minimal restrictions.
Once you’ve made these selections, click Create repository to finalize the setup. Your new repository will now include a README.md file and an LICENSE file, making it easier for others to understand and contribute to your project.
Step 6. Create your project workspace in FASSE#
Access a terminal in FASSE and navigate to the directory /n/dominici_nsaph_l3/Lab/projects where the NSAPH project workspaces are located. Then run:
git clone https://github.com/NSAPH-Projects/<project_name> <username>_<project_name>
Notice that the first argument is the URL of your GitHub repository and the second argument is
Use your
/n/dominici_nsaph_l3/Lab/projects/<username>_<project_name>folder as a personal workspace.If other colleagues are working on the same project and need to create their own workspaces linked to their GitHub accounts, they should follow a similar process. Each person should have their own local copy of the project repository to work independently.
The workspace name will be <user_name>_<project_name>, which ensures that each colleague has a dedicated space. Each colleague can now work independently in their personal workspace while contributing to the same project repository. They can pull updates from the shared repository and push their changes without interfering with others.
Note
If the git prompt asks for your password, do NOT use Github password. Instead, you need to enter the generated token in replacement of the password. See how to generate token here.
Going forward, make sure to update your GitHub repository regularly with your analysis code and documentation.
If you are not familiar with using git, check out this git tutorial.
Also, check out our guidelines for collaborative work on GitHub.
Note
If this is the first time you use github you might have to configure your account in FASSE by typing the commands below in FASSE’s command line.
git config --global user.name "Mona Lisa"
git config --global user.email "email@example.com"
By doing this, all code contributions (commits) from FASSE will be linked to your GitHub account.
Step 9. Organize your folder#
Consider organizing your project folder (and repository) as follows:
project-name
├── README.md
├── data/
├── code/
├── figures/
├── reports/
├── results/
└── .gitignore
Tip
Have a look at the NSAPH Project Template. Also, here is another template example for new research projects: djnavarro/newproject
Make sure to use the README.md and .gitignore special files. A README.md file is a standard documentation file where you should put information about the content of your
repository. A .gitignore file tells Git which files to ignore when committing your project to the GitHub
repository. It should be located in the root directory of your repo. Large data file and sensitive data should be
ignored by Git.
Warning
Be careful not to push sensitive data on GitHub. Don’t forget that Medicare/Medicaid data should not leave Harvard,
but your analysis code should be versioned with Git. A .gitignore file helps with that.
Add path and/or file names of your data in the .gitignore file. You can ignore the data sub-folder and/or
all files of a certain format like .csv, .nc or .rst. Add these as new lines in .gitignore. For example:
data/
*.csv
*.nc
*.rst
Step 7. Analytic Data#
Much of the NSAPH data is already available on FASSE. Check out the data catalogue here.
If you’d like to use any of the analytic datasets, create a symbolic link (symlink) of that dataset instead of creating a new copy. A symbolic link is a reference to another file or directory that the operating system interprets as a path to that file or directory (a shortcut).
This is how you create a symlink from your data folder (in the command line):
cd data
ln -s ../analytic/DATA_FOLDER .
Step 10. Scratch Space#
A scratch space provides a dedicated area for temporary storage and facilitates efficient data processing. It allows you to perform tasks such as data preprocessing, computationally intensive computations, and analysis, while storing intermediate files and temporary results. It is particularly useful in high-performance computing environments, scientific research, and data-intensive tasks where speed, efficiency, and data management are critical. The scratch datasystem is highly optimized for high-throughput file read/write. This means if you have to do lots of edits to large files or work with many small files, scratch may provide a more efficient means of operating.
When to use a scratch space? Whenever you need a temporary storage for intermediate data during processing or computations, use it to store data that is being actively manipulated or processed but is not needed for long-term storage.
Example scratch space usages
When creating a large dataset compiled from several analytic datasets. Merged data is large but takes time to compile so you want to save it to use for analyses but not take up valuable space on FASSE. Instead store the compiled dataset in scratch and access each time you need to run your analysis. if the merged dataset goes unmodified for 90 days it may be deleted, in which case you will need to rerun your script to merge the data.
For bootstrap analyses it is often quicker to create a set of bootstrap datasets. these datasets individually are large and collectively would overrun the usable space on FASSE. instead, store the temporary datasets in scratch and then have your bootstrap analyses load each individually. delete after use!
The lab has scratch spaces available within FASSE and CANNON:#
FASSE path:
/n/netscratch/dominici_nsaph/Lab/<your-project-subdirectory>
CANNON path:
/n/netscratch/dominici_lab/Lab/<your-project-subdirectory>
How to use the scratch folder? Create your own directory in this scratch space using your project name. For example, if your FASSE project name is heat-stress-project, then create a folder within the FASSE scratch folder:
mkdir /n/netscratch/dominici_nsaph/Lab/heat-stress-project
Instead of storing large files in your local project folder, write temporary files in this path.
Use a symlink to a scratch folder Ideally, you should not include full paths in a repository’s code. To avoid including full paths in your code, create a symlink to the scratch folder inside the data/ folder of your project using. data/ will contains a shortcut link to the scratch folder:
ln -s /n/netscratch/dominici_nsaph/Lab/<project_name> .
When you write or read a file use:
# In R
library(tidyverse)
write_csv("data/intermediate/<project_name>/<filename>")
read_csv("data/intermediate/<project_name>/<filename>")
# In Python
import pandas as pd
df.write_csv("data/intermediate/<project_name>/<filename>")
pd.read_csv("data/intermediate/<project_name>/<filename>")
To force Github to ignore file changes in the scrath folder, you will need to add a .gitignore inside your data folder. Here is an example of the gitignore file:
*
!*/
!.gitignore
!README.md
Note:#
The terminology of CPUs, nodes, and cores can be confusing in FASSE. One node is like a computer, and it contains one CPU and many cores. The multiple cores can do calculations at the same time. When requesting a job in FASSE, you request a portion of a node. However, the Slurm job management system refers to CPUs as the cores of the CPU.
Note
Make sure to acknowledge the use of FASRC in your publications. From the FASRC website, “Please use the following text as a guideline: ‘The computations in this paper were run on the FASRC Cannon cluster supported by the FAS Division of Science Research Computing Group at Harvard University.’”